domingo, 26 de outubro de 2014

Kettle Database Value Lookup ignore case hack

Technology credits:
Java & Oracle RDBMS
Spoon (a.k.a Kettle)


Today i want to share with you a hack on the Pentaho ETL engine: Kettle.  I was investigating this tool, exploring the capabilities of Kettle to see what it could do for me. I've came to the conclusion that this is a very powerful tool that can do a lot, but also has it's 'shortcomings' especially when it comes to performance when dealing with a large amounts of data (around 1Gb).

Problem:
As i was testing this tool, i was trying to compare an input field from a file to a database column on the Oracle DB. As sometimes happens input data can sometimes be RaNdOm CaSe. That means the data can match if we ignore the upper/lower casing.

Solution:
Easy! Do a case insensitive match of the input! (you might say...) As i've come to the conclusion, it's not that easy to do that using Kettle... I wandered the web in search of clean and straighforward solution but i didn't find any so here is my solution:

First of all, convert the input field from file to upper case. This is easy, you can just run a simple JavaScript step to the input field and you are done.
Then you have to compare the uppercased field with the column from the database also in uppercase mode. Not so easy when the Spoon UI only enables you to select the table and column name on the 'Database Value Lookup' step, unless... you hack it!!!

Here's a screenshot of the hack:
What's the secret?
I've found out that the field 'Lookup table' is added to an SQL statement after the FROM keyword but...it's not as simple as that. You have to trick Kettle: Make sure your query has double quotes in it (such as "ID"), that's how the hack works. Kettle ends up injecting that SQL, requesting a column in uppercase mode from the database :)

Happy Coding!

quinta-feira, 11 de setembro de 2014

ActiveMQ integration testing with Maven

Technology credits:
Apache Maven & Failsafe
Apache ActiveMQ


Disclosure

Before you start reading further: Keep in mind that this is a work in progress, and although i'm a "Systems&Informatics Engineer" i consider myself a novice programmer. If you have any question you don't see answered here, please leave your comment on the section below to help me improve this article.
Also, you should be aware that this post was a result of a lot of work. If you like it, please feel free to show your appreciation by offering me a cup of coffee through paypal and/or add value to this article by sharing your knowledge.

Objectives of this tutorial:

  • Share how to easily start/stop an ActiveMQ broker for integration test purposes using Maven.
Pre-requisites:
  • You have knowledge about the Maven POM and know how to change it. If you need an example base project checkout this.

Problem

If you are developing and need some middleware like ActiveMQ it's always nice to be able to fully automate the start/stop of this kind of software that will be running as a service on a production server. You don't have keep remembering (to others or to yourself) the pre-requisites about how to build a project. The second advantage is that you always start from a clean, predictable state. And the third is that because you can stop whatever software you needed during Integration Tests, you keep your workbench nice and tidy, releasing memory usage and CPU time, allowing you to produce code faster and more efficiently.

Solution - ActiveMQ

If you are using ActiveMQ, the solution is easy, just add the following code in the 'plugins' area of your Maven POM and you are set:

Now just fire 'mvn clean verify' sit back and enjoy the magic ;)

Happy Coding!

terça-feira, 1 de abril de 2014

JAX-WS development with Maven+Embedded Tomcat+MySQL

Technology credits:
Apache Maven & Failsafe
Apache Tomcat


Disclosure

Before you start reading further: Keep in mind that this is a work in progress, and although i'm a "Systems&Informatics Engineer" i consider myself a novice programmer. If you have any question you don't see answered here, please leave your comment on the section below to help me improve this article.
Also, you should be aware that this post was a result of a lot of work. If you like it, please feel free to show your appreciation by offering me a cup of coffee through paypal and/or add value to this article by sharing your knowledge.

Today we will be picking up the previous "Simple Document/Wrapped SOAP JAX-WS WebServices Tutorial with Maven+Tomcat+Failsafe" project and we will add MySQL database access support.
You can start by downloading the project (if you haven't done so already) and run the 'clean verify' targets just to make sure everything is OK and ready to go.

Chosing the way to access the database

Before going into implementation details, we should be aware of our options to connect to a database.
The easiest way would be to hard-code your connection details in Java. This solution stores all the connection details (including username/password) and because of that you would end up with a solution that requires more time and effort to maintain as you would need to re-build and deploy the web application.
To build a web application in a portable and flexible way we should use external configuration files and libraries that allows us to connect to whatever database we would like.
Keeping that in mind, how do we configure/build/deploy/test our web application using Maven?

Configuring the Web Application

The best way to configure your webapp is through 'Resource Injection' using Annotations like @Resource. For example: This requires you to instruct Tomcat to initialize this class as you would do with any "listener-class" (even though this is not explicitly defined as a "listener-class"). To do that, add the following line to your web.xml: Listeners are called in order of appearance in the web.xml file, so, make sure you initialize the DBConnectionFactory before any other class that migth require a database connection.
If this method fails, you can still use the alternative style of looking into the JNDI configuration as stated in the mkyong blog: The code above allows you to initialize the DataSource object just once, just before your WebService class is instanciated for the first time.

Context Configuration

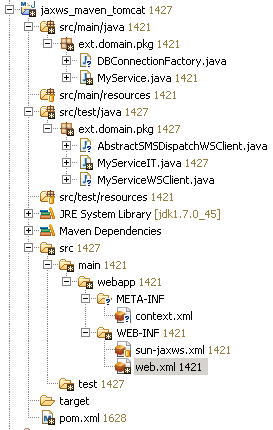
The above code trys to fetch whatever resource is defined under "java:comp/env/" named "mydb". This can already be defined in a production server using server.xml (for an all apps context configuration), but can also be defined as a "per app context configuration". To use the latter type of configuration, we need to add a META-INF folder in our webapp folder and add a context.xml to that folder like so:
The context.xml file shall contain at least the following: This context.xml is for sample purposes only. Even for test purposes only you shall change the username and password to one that matches the same privileges that you use in a production environment. Also, on a production server you can add other parameters to the description of the resource such as DataSource parameters and container related configurations (such as autentication type) if you wish. It is also desirable to add your database name to the database connection URL, making your webapp even more portable.

Configuring the Maven build

And now for the trifecta we have to configure Maven to include the MySQL Connector/J library in the WAR file. Change your current Maven pom.xml and add the following to the dependencies configuration: Adding this dependency to the project will automatically add the required Connector/J library to the WAR built by Maven. Also remember that this way our webapp stays portable, meaning that it would be much easyer to change database provider by just adding/removing the required library inside the WAR and it's also easy to carry the WAR file from one container to another without having to pre-install other libraries in the host containers.

That's it! If you followed this post correctly you should now be able to get a Connection from the DataSource factory using: and start chatting with your database in the SQL language :)

Happy Coding!

terça-feira, 11 de março de 2014

Jango SMTP - A new solution to an old system

Technology credits:
APC Symmetra RM 6000
APC AP9617 Network Management Card


So recently i've came across this UPS from APC, a Symmetra RM 6000. This system has the ability to sustain a load of up to 5.6kW (dependng on the number of power modules installed) and has a battery capacity of up to 6000kVA (depending on the number of batteries installed).

It was disabled for quite some time now, and the batteries were dead. As I wanted to know more about this (very) powerful UPS, I decided to configure the UPS Network Management Card (AP9617). I realized that this UPS is capabilities did not stopped at the amount of load this system could handle, but also that it was equipped with a network card capable of sending e-mails through SMTP servers.

Back in the days this AP9617 Web interface was developed the only thing they needed to send e-mails was the SMTP server address, some e-mail address and that's it.

Nowadays all SMTP servers require some sort of authentication and this AP9617 is not ready for it. Upgrading the Network Management Card was not an option as the company could not afford it. And updating the AP9617 firmware was not an option for me because i could not afford the risk of damaging the AP9617 Network card. So, i was stuck...

I tried to find some sort of SMTP provider that still allowed me to send e-mails without username/password and i found Jango SMTP! After a few configuration steps i was ready to go and started sending e-mails.

What's the catch?

Well... for Jango SMTP to be able to send e-mails for you, you have to provide them with your current IP Address, so that they know that the sender from IP AAA.BBB.CCC.DDD is a permitted sender and the servers can relay the message. As the systems IP Address kept changing we needed to update the systems IP address every time a new IP lease was issued. That's were the Java comes in to save the day and update that programmatically using the Jango SMTP API :)

If you want the code for this software please write me an e-mail to 'rochajoel' at GMail.

quinta-feira, 16 de janeiro de 2014

Caveat: javax.xml.ws.Service.create method is not thread safe!

Technology credits:

I've recently stumbled on some random exceptions in my Tomcat client-side Java code. Exceptions such as:

So after several hours of debug, i've managed to confine the problem to this single instruction:

Service.create(...);

This is an example of a 'Factory Method Pattern' gone horribly wrong. Why? Because 'by default' you can run multiple threads simultaneously in the same method. As this is a 'static' method this means that all threads invoke the same method at the same time. This results in random exceptions depending on the phase were the racing problem occurs.

To avoid this kind of problem in you own code, always remeber: Constructors are ALWAYS thread safe. If you cannot avoid the 'Factory Method Pattern' make sure you mark that and all other 'Factory Methods' in the same class as 'synchronized' which will slow down the creation of objects but will guarantee that no racing conditions occur.