
|
| Apache Maven & Failsafe |
| Apache Tomcat |
Disclosure
Before you start reading further: Keep in mind that this is a work in progress, and although i'm a "Systems&Informatics Engineer" i consider myself a novice programmer. If you have any question you don't see answered here, please leave your comment on the section below to help me improve this article.Also, you should be aware that this post was a result of a lot of work. If you like it, please feel free to show your appreciation by offering me a cup of coffee through paypal and/or add value to this article by sharing your knowledge.
Today we will be picking up the previous "Simple Document/Wrapped SOAP JAX-WS WebServices Tutorial with Maven+Tomcat+Failsafe" project and we will add MySQL database access support.
You can start by downloading the project (if you haven't done so already) and run the 'clean verify' targets just to make sure everything is OK and ready to go.
Chosing the way to access the database
Before going into implementation details, we should be aware of our options to connect to a database.The easiest way would be to hard-code your connection details in Java. This solution stores all the connection details (including username/password) and because of that you would end up with a solution that requires more time and effort to maintain as you would need to re-build and deploy the web application.
To build a web application in a portable and flexible way we should use external configuration files and libraries that allows us to connect to whatever database we would like.
Keeping that in mind, how do we configure/build/deploy/test our web application using Maven?
Configuring the Web Application
The best way to configure your webapp is through 'Resource Injection' using Annotations like @Resource. For example: This requires you to instruct Tomcat to initialize this class as you would do with any "listener-class" (even though this is not explicitly defined as a "listener-class"). To do that, add the following line to your web.xml: Listeners are called in order of appearance in the web.xml file, so, make sure you initialize the DBConnectionFactory before any other class that migth require a database connection.If this method fails, you can still use the alternative style of looking into the JNDI configuration as stated in the mkyong blog: The code above allows you to initialize the DataSource object just once, just before your WebService class is instanciated for the first time.
Context Configuration
The above code trys to fetch whatever resource is defined under "java:comp/env/" named "mydb". This can already be defined in a production server using server.xml (for an all apps context configuration), but can also be defined as a "per app context configuration". To use the latter type of configuration, we need to add a META-INF folder in our webapp folder and add a context.xml to that folder like so: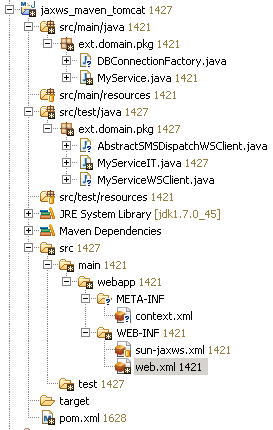
Configuring the Maven build
And now for the trifecta we have to configure Maven to include the MySQL Connector/J library in the WAR file. Change your current Maven pom.xml and add the following to the dependencies configuration: Adding this dependency to the project will automatically add the required Connector/J library to the WAR built by Maven. Also remember that this way our webapp stays portable, meaning that it would be much easyer to change database provider by just adding/removing the required library inside the WAR and it's also easy to carry the WAR file from one container to another without having to pre-install other libraries in the host containers.That's it! If you followed this post correctly you should now be able to get a Connection from the DataSource factory using: and start chatting with your database in the SQL language :)
Happy Coding!
